Here’s our sponsored event rider, Eilidh Costelloe, talking about using studs in your horses shoes. This short series of clips is an excellent guide to the different types of studs which are available - each style designed for a different purpose.

What you'll need...
So that you don’t lose your studs and associated equipment, you should keep everything together in a box or kit.
Your stud kit should contain the following:
- A selection of different shaped studs
- A stud tap that’s used to clean mud from the stud hole before you fit the stud
- An adjustable stud spanner
- Stud plugs
- A large nail that you can use to push the plugs into the stud holes
A small magnetic metal dish is also extremely handy to keep the studs just where you want them. That way, if the dish is kicked over, you won’t lose the studs in the grass. You can buy magnetic wristbands that do the same job, safely holding the studs until you want them.
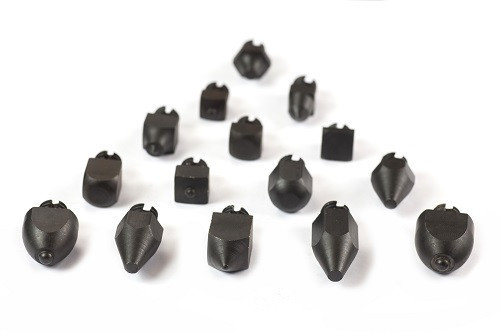
Which studs should you use?
There’s a wide range of studs to choose from, and it can be confusing for the novice user to choose the right ones for the ground conditions and job they’re required to do.
As a general rule of thumb, the softer the surface, the larger the studs you’ll need.
Before selecting your studs, it’s crucial that you find out what works for you and your horse. If you try out a few different studs while you’re working your horse at home, you can stop when you need to and make any changes that are necessary.
To help you make the right choice, here’s a guide:
Sleeper or blank studs
These are small studs that are used to protect the stud holes from getting filled with dirt or when only a very small amount of extra grip is required.
Road studs
Road studs are small, square or hexagonal studs that can provide your horse with extra traction on good going when you’re doing normal work. Despite their name, road studs are better used on grass or on a surface, rather than on the road.
Road studs have a slightly domed center, which distinguishes them from blank or sleeper studs.
Bullet studs
Bullet studs are long, rounded dome-shaped studs that are most suitable for use in mud or soft going.
Cone-shaped jumping studs
Cone-shaped jumping studs are best suited for use on grass that is classified as “good going.” In other words, the grass will comfortably take the stud.
Also, if your horse tends to lose his balance on fibrous indoor footing, these are the best studs to use.
Slim, pointed studs
Slim, pointed studs are designed for use on firm ground that a larger stud won’t easily penetrate. However, you shouldn’t use these studs on the road, as they’re too long and could cause your horse to have difficulty in balancing himself.
Short, dome-topped studs
Short, dome-topped studs are best-suited for use on loose sand schools and well-watered grass surfaces. These studs will provide your horse with extra grip and security, without stopping him dead in his tracks!
Pointed jumping studs
Pointed jumping studs are the best choice for use on varied terrain, especially when you’re riding across-country.
This design of stud is large enough to give you extra grip on wet going while being narrow enough to penetrate firmer sections of ground.
Fat top with pointed lower section
A stud that’s designed with a fat top and lower pointed section is perfect when riding on firm going that is slippery on top. For example, on a hard grass arena after overnight rain or a heavy dew.
Large, uniformly fat studs
Big studs that are uniformly fat are ideal for use on deep going or boggy ground.
SupaStuds Launch at Country Ways
SupaStuds are an award-winning product which have a unique, self-cleaning design which enables them to be screwed into a shoe without previously re-tapping out the hole. This makes them far faster, easier and safer to insert than conventional studs. A high-tech manufacturing process is used to harden SupaStuds, making them longer-lasting than tungsten tipped studs as they wear evenly. This hardening process also makes them rust-resistant, prolonging their life.
SupaStuds have been developed in conjunction with, and are endorsed by, top eventers such as Matt Ryan. British Team farrier Haydn Price, Olympic Silver medalist Mary King and Show-Jumping Grandmaster David Broome are also supporters. SupaStuds are used by many of the top event riders in the country and have become the studs of choice for thousands of competitors at every level across the board in equestrian sport.
Preparation for using SupaStuds
Ask your farrier to put stud holes in your shoes, threaded as normal with a standard 3/8" Whitworth thread (he/she will be familiar with this).
SupaStuds are also available for 10mm threaded stud holes for our French & German customers.
Opinions vary on whether you should use one or two studs per shoe – consult your coach and/or farrier for advice or ring our helpline.
Remember that fitting stud holes to shoes is impossible to do once the shoe is on the horse, so you need to ask your farrier BEFORE he fits them!
Fitting your SupaStuds
Unless you have used your studs very recently (in the last few days), it usually helps to prepare the stud holes the day before you want to use your SupaStuds. You can then insert SupaStuds travel studs to keep the holes clear, and it will be easy to replace these with your choice of studs for the competition the next day. If you don’t want to use travel studs, insert and remove any SupaStud as described below to clean the stud holes.
If you plug your stud holes, first remove your plug. If you do not use plugs, remove the excess dirt and debris from the stud hole using your preferred method: we find a horseshoe nail works well, but you need to ask your farrier to take the sharp end of the nail off before you use this method, or use a nail that is well worn.
Once you have most of the dirt and debris out of the stud hole, simply pick up the SupaStud you want to use and screw it carefully into the stud hole (it goes in clock-wise). Make sure that you are screwing it in with the thread in the hole and that you haven't "cross-threaded" it – if the stud seems to be going in crooked, take it out and try again.
Once you have screwed the stud as far as you can with your fingers (this may not be very far at all, depending on the state of the stud hole!) use a spanner to tighten it. You should find that the stud will screw in all the way up to the stud's shoulder (ie where the flat base of the stud meets the neck). Once you get to this point, give the stud one last quarter turn with the spanner if you can – this locks the stud in place against the shoe and should prevent it from loosening in use.
Removing your SupaStuds
Simply use a spanner to remove your studs (anti-clockwise). If you like to plug your stud holes do this immediately, before any grit and dirt can penetrate the hole.
Caring for your SupaStuds
Make sure you keep your studs clean, with the slot and base clear of mud, as they won't work properly if these are clogged up. The best thing to do is to clean your studs with a wire brush or similar straight after you take them out, before they go back in your stud kit.
Some people like to spray them with WD40 or similar to keep them clean and fresh to use.
Trouble-shooting
If you are struggling to get your SupaStuds to screw in it could be that the top of the hole in the shoe is damaged – either through road-work or stony ground. This will be an issue whatever studs you're using! Ask your farrier to countersink the edge of the stud hole next time he visits and this will help to protect the thread in your horse's shoe. It's also a good indicator of when your shoes need replacing! In the meantime, you may have to nip the road burr off with your tap, but there's still no need to tap the entire hole.
Supa Studs are available at Country Ways. Please contact us for more details info@countryways.com, call us on 01224 585150 or visit www.countryways.com


